She is known as a "Manipulator" Greenberg is credited by some within the commercial photography industry
as having produced several unique styles that have since been emulated
by other photographers. "Like LaChapelle and Avedon, Jill has pioneered a new style of photography, and her impact can be seen throughout the entertainment industry".
I am trying to achieve similar lighting results and retouching effect to a series of "Shiny" By Jill Greenberg. My Pastiche will be based on the same or as close as possible lighting setup to Jill Greenberg and the post processing in the photoshop. I would like to create a single photograph which would reflect the same style and idea of her work.
Here is the Lighting diagram for the first attempt. This is one of the Jill Greenberg's famous lighting setups.
Jill Greenberg Lighting Setup 1.
This setup took me a while to get it right. Especially with the kicker lights and the background light, which either way has to create a graduated falloff or pure white background, which then could be turned in one of those dark blue or gray backgrounds in Photoshop. See an example Below.
Gwen Stefani, The lighting is vital to create this effect. Also skin retouching is an important part of the final results.
With a Beauty setup, kicker lights are highlighting the cheek line and separating it from the background. In comparison to above posted photograph, this result is achieved by slightly different lighting setup, also the skin retouch is not applied as much as above.
Simon Cowell
I really Like the style and effect on how Jill Greenberg is retouching these portraits. Especially those ones with a very smooth and shiny skin tones. From series of "End Times"
“Lead Train”, 2007. In my opinion these are the most interesting series by Jill Greenberg. I really like the post process and almost unnatural achieved results, the shiny and smooth skin, with strong lighting pattern.
“The Truth”, 2005
“Misinformation”, 2005. I am very interested in the lighting and the smoothness of the post processing in the Photoshop.
Greenberg's "End Times", a series of photographs featuring
toddlers, was the subject of controversy in 2006. The work featured
stylized hyper real closeups of children's faces contorted by various
emotional distresses. The pieces were titled to reflect Greenberg's
frustration with both the Bush administration and Christian Fundamentalism in the United States.
The method for getting the children to cry, in some cases, achieved by
offering the children candy, then taking it away, spurred allegations of
unethical conduct and provoked the submission of numerous complaints to
the art gallery that hosted a public showing of Greenberg's work.
Some more examples of her work, see the links below:
This one is with reflecting umbrellas instead of beauty setup, and the ring flash. Due to very complex ring flash in studio and lack of strobes I was not able, yet to simulate a very similar setup. Hopefully my next session will be based more on this type of setup by Jill Greenberg. See the Diagram Below.
Jill Greenberg Lighting setup 2.
Same lighting setup as above. This lighting is very popular amongst other photographers.
Lighting diagram No. 1 in more depth.
Just with the background light ( approximately 2 stops higher than foreground to achieve pure white background)
I chose to use the pure white background for the post processing reasons, and (blue gradient color, similar to Jill Greenberg)
Here is the background light with the left kicker light applied. It will give this interesting rim light and separation from the background.
With the background light and the left kicker light. Kicker lights does not have any diffusers on so the light is quite harsh, as it can bee seen in the example. To eliminate it I could apply softbox, umbrella or similar, but then the light would be different from my desired goal.
Another step up, and this diagram shows the results with the background light and both kicker lights
It took me a while to get it right and as close as possible to Jill Greenberg lighting setup. As a comparison I did use the Arnold Schwarzenegger portrait by J. Greenberg
Introducing the Key light. It will give the smooth light characteristics and get rid of the nasty shadows.
This is known as a Butterfly lighting, it casts the butterfly shape shadow underneath the nose, however to make it look even better, it needs the fill light to eliminate shadows under the chin and give the final kick to overall lighting.
Final Lighting setup and the result. I was looking to achieve bright lighting patch on the forehead, rim light (kicker) and butterfly lighting in general which is used by Jill Greenberg quite often. I could increase the light intensity, to achieve brighter highlights. The forehead is slightly too dark, and chin area bit too dark.
Here is some more information of her approach to work and behind the shooting scenes and interviews of Jill Greenberg
Most of the times she is using the reflecting umbrellas with the ring flash and the graduated background light.
Couple of Videos where photographers are recreating the same setup as Jill Greenberg and discussing them
Similar to Jill Greenberg's setup's
Here is my attempt to achieve similar background with the studio strobes, I was not able to achieve good results with this setup, the background in not smooth and the falloff is too harsh, it has to bee more even and fade away gradually.
The same setup as below based on the Lighting diagram No.1. The only difference here is the background light with the snoot attached to achieve this gradual falloff and the fill light is the foam reflector instead of small softbox. I am not pleased with the background effect, therefore I decided to use pure white background and edit it in the Photoshop to achieve dark blue/blue color.
Tutorial of the editing in the Photoshop
I did my editing based upon this tutorial
Here is my first attempt and results of editing 2 photographs
First Photograph with editing in the Photoshop, however there are some inaccuracies. Her "Shiny" and "End Times" series has this beautiful skin smoothness. This particular attempt is without the skin smoothing. Major downside is the harsh contrasty outline of the selection itself, I could improve my selection skills and technique to achieve smoother and realistic results.
I did soften the skin and the tones, it looks much more closer to Jill Greenberg's style. However, it is not as real as it has to be. I pushed highlights too far, but is is good starting point. Also I have to work more on the selection, especially the hair area, to make it look more natural and real.
Second Photograph, again, before the skin softening. To eliminate the harsh outline I did use the burn tool in the photoshop and simply burned highlight outline till the artifact was gone. Gradient is very close to Jill Greenberg, however the colour could be slightly greyish.
With a smoother skin and slightly enhanced highlights to achieve this shiny and smooth look. Although I could pull the highlight even further to achieve more shiny and smoother look.
Here are few very interesting and useful portrait retouching tutorials. See the Link Below.
Before The Burning and Dodging process. Photograph looks very flat, without strong lighting effect. Also After watching few good videos relating the selection process, I was able to achieve much better results, even without burning.
After, dodging and burning makes this photograph more pleasing, it has more dimension and character.But the gradient is too weak, I need to work more on the background. Especially the highlighted circle behind the subjects head, which at the moment is very flat and way too dark.
Contrasty Hard Edges
With Dodging the Highlighted edges I was able to reduce the contrasty edges and make it look more real.
With Smooth Skin
Final Photograph after few important steps, dodging and burning, skin smoothing and the background editing.
Before Dodging and Burning. Overall composition is good, however some burning and dodging is needed.
Final Version after Editing
The hardest part of the editing process in the Photoshop is make a perfect selection of the main subject, especially the hairline. I was progressively going towards to better results each time by using some of the "Refine Edge" settings in the Photoshop. As I was shooting on the white background my selection had a little bit too much contrast on the contour, to eliminate that effect I did use the option in the Mask Edge selection, "Decontaminate Colors", "Smooth" and a little bit of feathering. As a last resort I did use also some burning on the edges so it would blend more realistically with the background.
Here are few good videos which I did use, to achieve better results in the selection process. See The Link Below. My selection process is 90% based on these tutorials.
Better selection examples by using more precise and detailed selection.
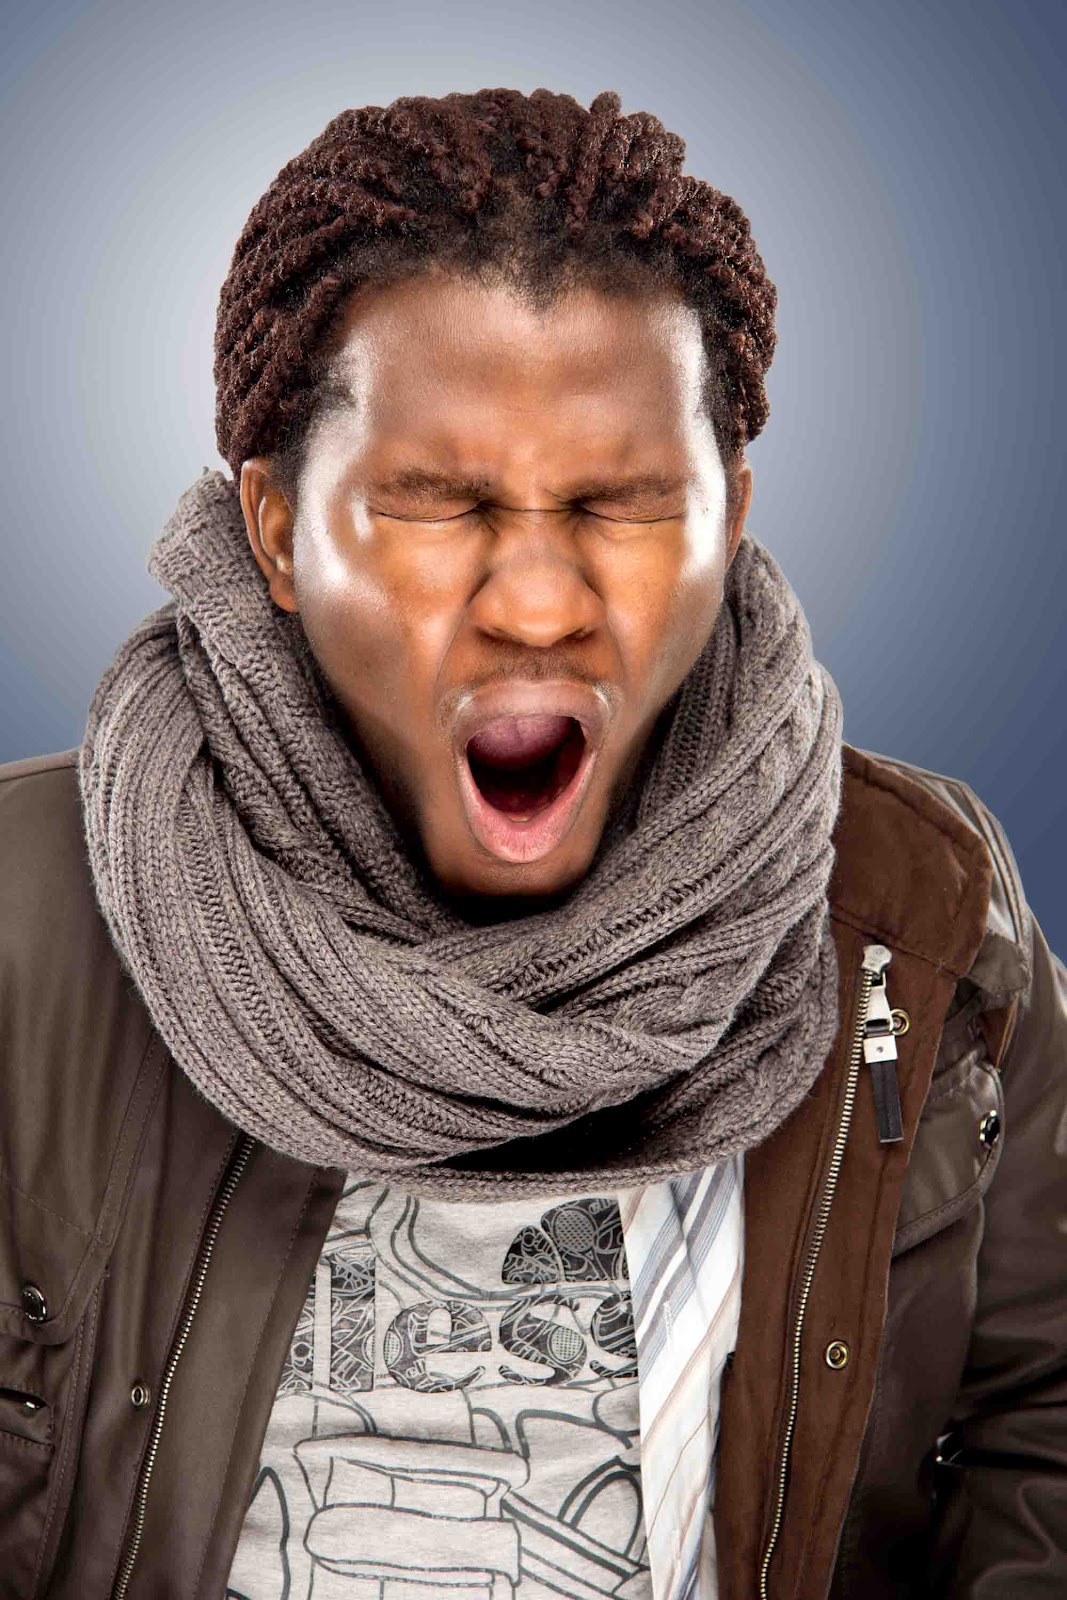
This is the original RAW file, with enhanced contrast, blacks and sharpening. I like the composition and overall look of this photograph. Lighting is as close as I could manage in the studio with available kit.
Final Version after retouching. Jill Greenberg style has quite a bit of retouching, especially the skin smoothing, dodging and burning to bring out the "Shiny" and tonally beautiful effect which I am after as well. This time from all above examples the background is created by layer underneath colored in blue/gray tone. To achieve the halo effect I did simply paint it with the white soft brush, conversely to the circular gradient tool. The reason for that was the flexibility, I had a bit more control over the area which I wanted to be very bright, creating this interesting and quite popular background lighting.
There is another version of the final photograph, but this time it is enhanced a little bit more. Highlights are brighter and shadows darker. Some of Jill Greenberg's editing is pushed a bit more, to achieve a little bit unreal look, but that is what she was after. As she states "Photograph does not have to reflect the reality in true way always". She is known as "Manipulator" A lot of her work is retouched almost between the real and unreal. Especially the series of "End Times" and "Shiny" That is why I like her work.
Version 2 of the final Photograph. More crispier and tonal range has more contrast due to the enhanced highlights and shadows. In comparison to above version, I like the Burning and dodging effect on the clothing more to first version rather than this, but the face itself is edited better in the last one. I concentrated on the skin more, and the last version dodging is carried out more. Highlights and dark areas are pushed further than previous, which works better in this case. However to make the final version I have to combine these two together, the clothing needs to be more defined and contrasty. The skin colour temperature is slightly too warm otherwise I am happy with my progression towards the final Photograph.
This project was my favorite of all of them. I really liked the way in how I could explore the studio basics and even push myself to achieve my desired goals. It was very challenging and time consuming project. I spent a lot of time in the studio and Photoshop post processing. If I did have more time I would definitely try to achieve closer results with lighting alone rather than doing it in post processing. For instance the background lighting in the studio was not even close to achieve optimal gradient pattern, it was too harsh and uneven due to lack of grid filter or more specified light. Therefore I decided to shoot on the white background and change it later in the Photoshop which also was not the easiest way. Moreover I think I did succeed and the final result is very good. It was very easy to work with my model. Things went smoothly from start to finish. Although the setup alone took me up to two hours of hard experimenting and metering to achieve best results.
Jill Greenberg uses a lot of post processing techniques so it was vital to learn them in my own practice. Also it was very good exercise on dodging and burning, to see how the light affects the shape and form. As I said the only thing which I could not do as good as I wanted was the background light and possibly finer selection around the hair, but I did it as good as I could.
The reason why I chose specifically this artist was the impact from her work with portraits of "crying toddlers" and series of "shiny" Once I saw her work I knew I want to try to imitate her style and to learn a bit of her retouch style and techniques.
This post is amazing. I think I can speak for many people in saying that it's because of generous people like you caring enough to share your insights, that people like me can continue to elevate our quality of work/quality of life. Can't thank you enough!


This post is amazing. I think I can speak for many people in saying that it's because of generous people like you caring enough to share your insights, that people like me can continue to elevate our quality of work/quality of life. Can't thank you enough!
ReplyDeleteBlake Sullivan
Thank you very much for the sharing! COOL..
ReplyDeletephotographers in orlando
Wow, thanks a bunch!!!!
ReplyDelete